

Multithreading can be hard to get right. But it’s also vitally important to getting simulations running smoothly on resource constrained mobile devices. In my career at Microsoft I’ve had the opportunity to spend more than 4 years helping partners write high performance apps for HoloLens. I also spent another 4 years helping partners write high performance apps for phones and tablets.
This is an article I’ve been meaning to write for a very long time. It’s basically an 8 year brain dump of everything I know about multithreading for AR/VR/MR simulations. While the article focuses mainly on Unity and C#, I hope the high-level concepts will still be valuable to simulation developers of all languages and runtimes.
Table of Contents
What’s a thread?
I realize that’s a basic question, but I’m starting here for an important reason. One that will become clear later in this article.
Wikipedia describes a thread as:
A sequence of instructions that may execute in parallel with others.
I emphasized parallel because it is paramount to this discussion. The ability to have more than one thing running at the same time is what makes threading vital to simulations.
A quick note on cores vs threads
A single CPU can have multiple cores and some cores can run multiple threads. The Ryzen Threadripper, for example, has up to 64 cores and each core can run 2 threads. That means if you write your simulation to be highly multi-threaded, you could have up to 128 different things all happening in parallel. You could use those threads to run the AI brains of your NPCs, or crank out collisions in a physics simulation.
Keep in mind that most real-world scenarios won’t approach 128 threads though. Even the flagship Intel i9-10900k only offers 20 parallel threads. Still, writing multi-threaded code means that multiple things can be happening at the same time on devices which provide multiple cores.
How threading impacts your app
Even if you don’t depend on advanced AI, almost all MR apps use physics in some way. The buttons in a hand menu, for example, use physics to detect when the tip of the finger enters the face of a button.

But far more important than physics is rendering.
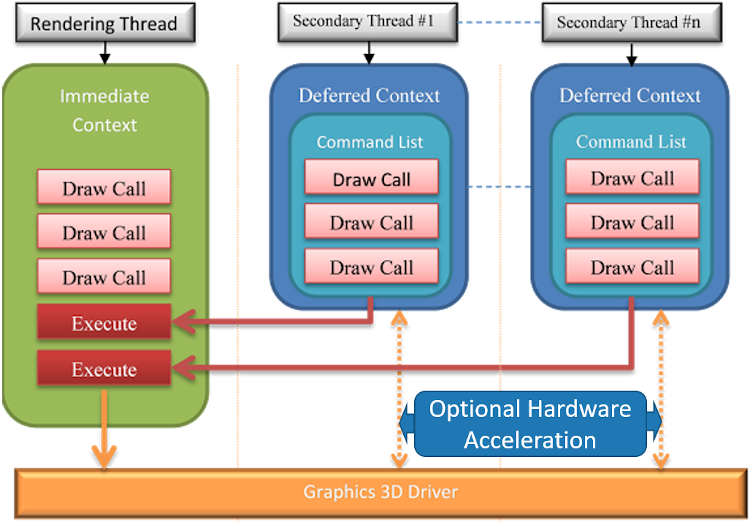
Virtually all game engines (Unity included) still depend on single thread for rendering. That’s right, only one single thread can actually draw on the screen. Even the ultra-low-level DirectX API only supports queuing commands on secondary threads. Those commands still have to be sent to the Render Thread for drawing. That’s one special thread!
As you can imagine, getting your code off the Render Thread frees the engine up to draw things. You’ll achieve higher frame rates and see less hitching and stuttering. Your app will feel more responsive and stable.
Okay, so don’t run code on the Render Thread?
It certainly sounds like something to avoid, doesn’t it? But it turns out that the Render Thread is the default place where all code runs! Not only that, running code on the Render Thread is simply unavoidable. To see why, let’s take a look at a basic Unity Cube.
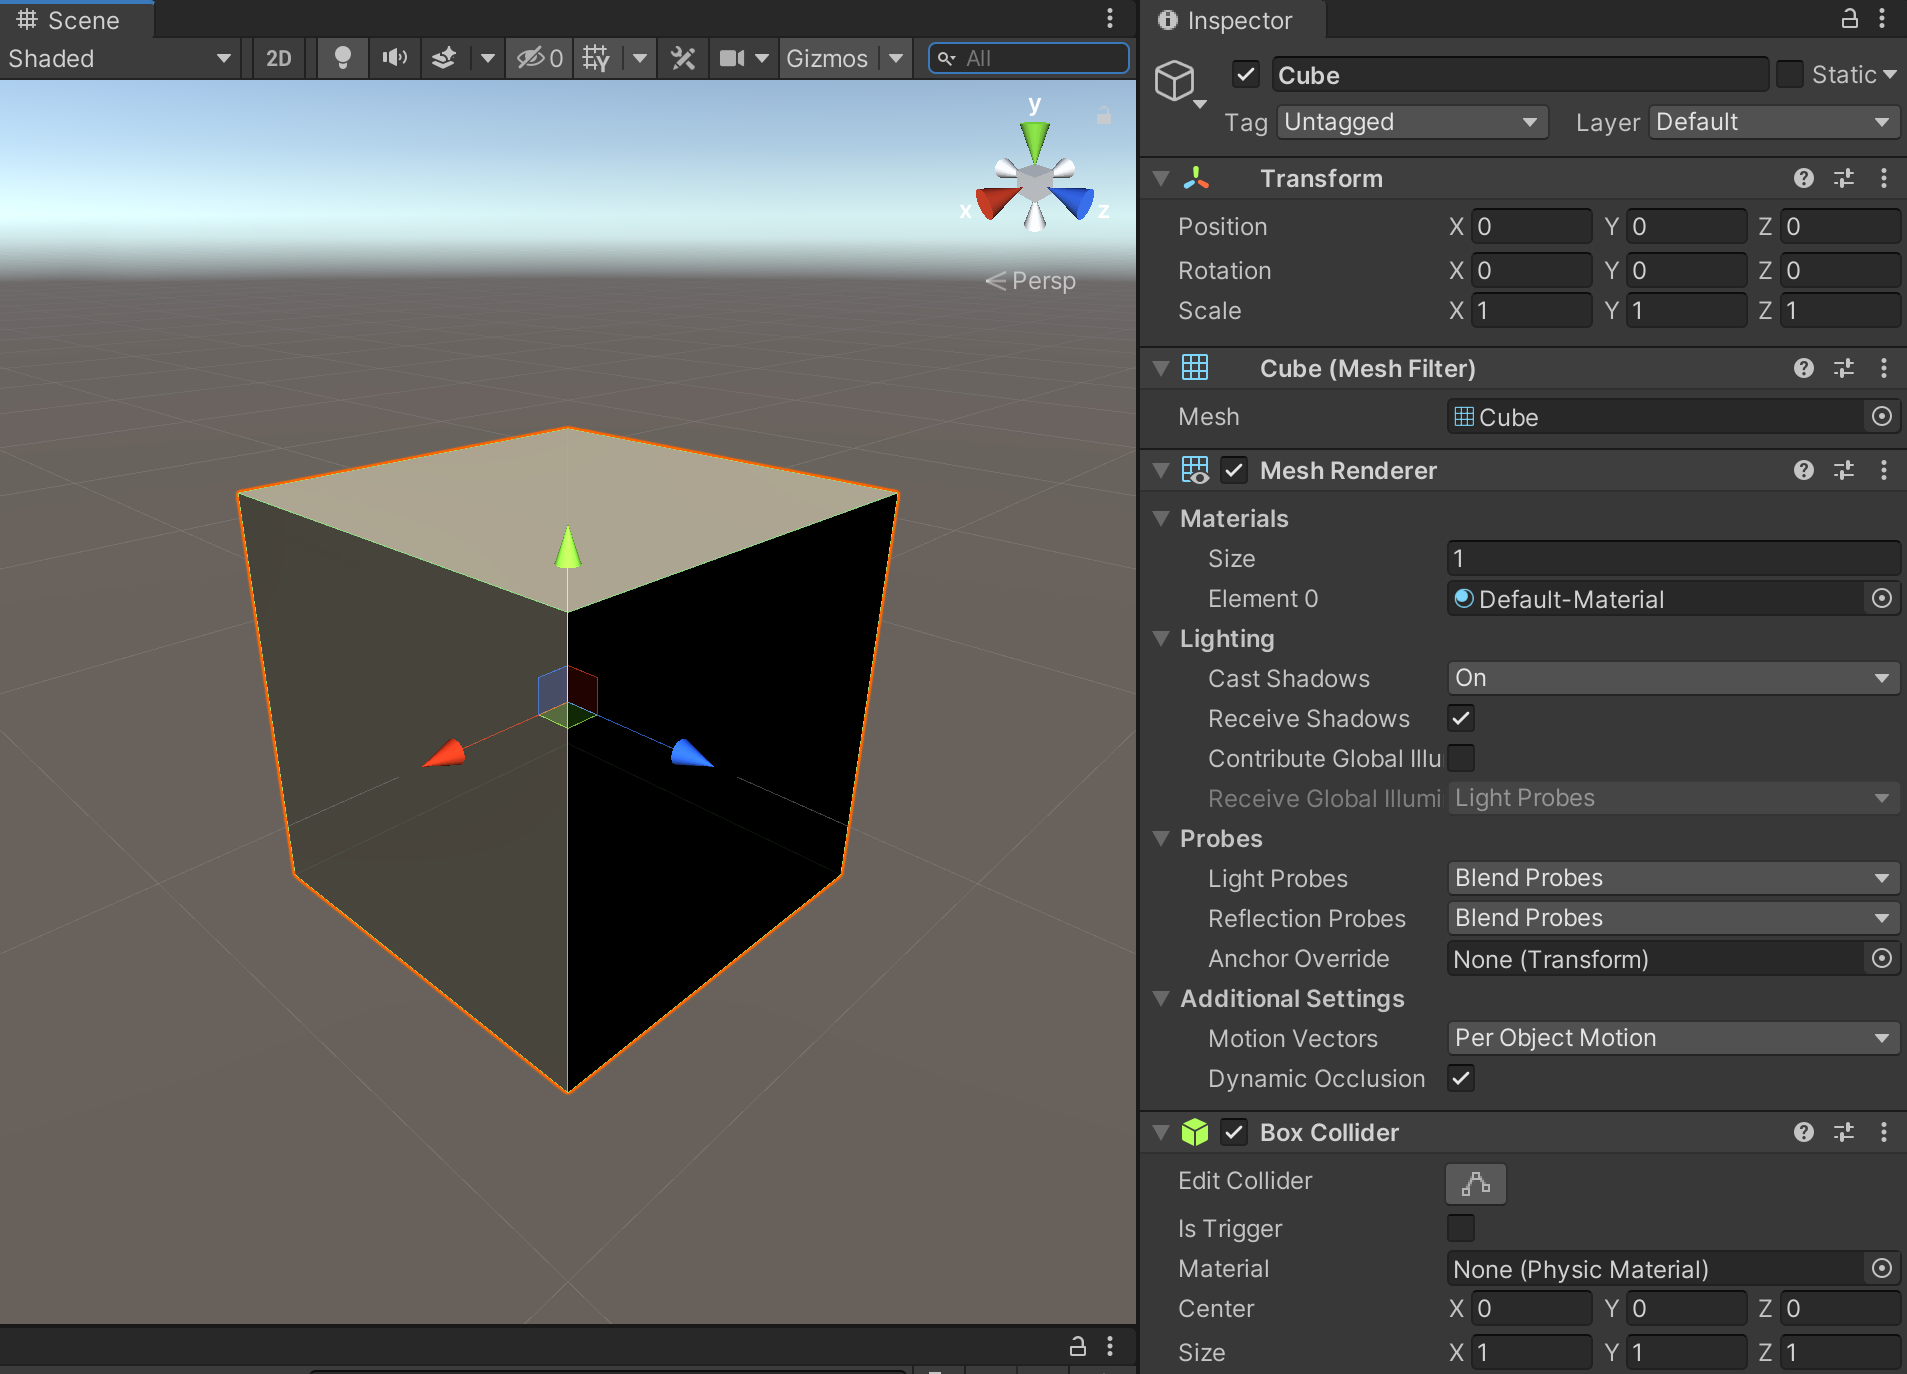
One of the main things that makes a Cube a Cube is a behavior called the Mesh Renderer. What does Mesh Renderer do? Well it draws the Cube of course. 😁 In other words, for a Unity Cube to be a Cube, it must live on the Render Thread!
Why coroutines aren’t threading
When Unity developers discover coroutines, many believe they’ve discovered multithreading. Unfortunately this couldn’t be further from the truth.
Unity’s doc on coroutines says:
A coroutine is like a function that has the ability to pause execution and return control to Unity but then continue where it left off on the following frame.
It’s important to realize that coroutines still run on the Render Thread!
Imagine a simple Unity app running in a loop like this:

If Behavior A starts two coroutines, the loop simply changes to:

The only difference between a coroutine and a regular function is that parts of a coroutine can be suspended between frames. The moments when coroutines are suspended include any lines with the keyword yield. While this might free up time for other things to run, badly written coroutines can still easily starve the Render Thread.
Since coroutines don’t run in parallel, coroutines should be considered a time slice mechanism at best. They’re not actual multithreading!
What about Thread.Start?
Ahh, we finally get to our first real option for multithreading. System.Threading.Thread does in fact represent a thread, and calling Thread.Start will cause work to begin running in parallel on that thread.
But there’s something very important to understand about the Thread class. An instance of the Thread class represents an object that is capable of doing work, rather than a request for work to be done. Many functions can be scheduled to run on a Thread, and waiting for a Thread to complete doesn’t necessarily mean a function completed successfully. An exception might get thrown instead, for example.
It’s for these reasons that the Universal Windows Platform (which HoloLens runs on) doesn’t even include System.Threading.Thread. Instead, UWP provides something called the ThreadPool where individual work items can be scheduled.
I’m not going to cover Thread or ThreadPool in this article because I want to focus on a different approach. But I still wanted to touch on these briefly since Unity developers who used Thread in the past will likely find it confusing or frustrating when their code won’t compile for HoloLens. The Thread class may get added to a future version of UWP, but I hope to demonstrate that even if it were available there’s still a better pattern to follow.
The hidden evil in callbacks
What is a callback? Wikipedia defines a callback as:
Any executable code that is passed as an argument to other code. (…) This execution (…) might happen at a later time as in an asynchronous callback.
Developers who write “classic” multithreaded code are very familiar with callbacks because once you start running code in parallel, somehow you need to know when when it’s done!
Here’s some pseudo-code for how a callback might work:
public void LoadData(string fileName, Action loadCompleted)
{
     // Start a worker thread
     ...

     // Now running in the worker thread:
     {
          // Open file and load the data
          ...

          // Notify that the work is done
          loadCompleted();
     }
}
But what if that code never completes? What if an exception is thrown on Line 9 because the file is locked or the data is corrupt?
The callback will never get called!
Without extra coding, the application will never know that an error occurred. As far as the application is aware, LoadData ran successfully. This is because the exception didn’t occur in LoadData, it occurred in the thread that LoadData created.
Orphaned callbacks have always been a source of pain for developers trying to write and debug multithreaded code. In short, this is because the request, the work and the result are completely detached from each other.
What is cross-thread scheduling?
Let’s take another look at the pseudo-code from before:
public void LoadData(string fileName, Action loadCompleted)
{
     // Start a worker thread
     ...

     // Now running in the worker thread:
     {
          // Open file and load the data
          ...

          // Notify that the work is done
          loadCompleted();
     }
}
Did you notice that the call to loadCompleted on Line 12 is actually executed in the worker thread? This is a problem if we want to visualize the data once it’s loaded. Remember, loadCompleted is running on a worker thread but we can only create GameObjects on the Render Thread. This where cross-thread scheduling comes in.
In the Azure Spatial Anchors for Unity sample you’ll find a script called UnityDispatcher. UnityDispatcher allows code running on any thread to request that code run on the Render Thread. You might have even seen this in action without realizing it.
Here’s a code snippet from the OnCloudAnchorLocated handler:
protected override void OnCloudAnchorLocated(AnchorLocatedEventArgs args)
{
	...

	UnityDispatcher.InvokeOnAppThread(() =>
	{
		...

		SpawnOrMoveCurrentAnchoredObject(anchorPose.position, anchorPose.rotation);
	});
}
Whenever ASA locates an anchor, the AnchorLocated event is raised on a worker thread. If all the app needs to do is write a message to the log, this worker thread is acceptable. In fact it’s preferable. But this app needs to spawn a GameObject or move an existing one, and those two operations can only happen on the Render Thread. InvokeOnAppThread says “I know I’m in a worker thread, but I need these lines of code to run on the Render Thread“.
Cross-thread scheduling in Unity
Though all multithreaded systems have their own ways of scheduling work, Unity’s approach is a bit unusual. As far as I know, Unity offers no direct API for scheduling work on the Render Thread. What they do offer is an indirect way of accomplishing the same thing.
UnityDispatcher keeps a list of commands that need to run on the Render Thread. When a worker thread calls InvokeOnAppThread, all that happens is the code gets added to the list. When the application starts up, UnityDispatcher registers itself as a coroutine. Later, on each frame, UnityDispatcher checks to see if anything is in the list. If so, that code gets executed as part of UnityDispatcher‘s Update routine.
UnityDispatcher is not tied to Azure Spatial Anchors so you can copy this class and use it in any project. If you don’t have ASA you can also grab a copy of this class from my ThreadUtils project on GitHub.
Brilliance of Task-based programming
As I mentioned above, debugging multi-threaded code is difficult because the request, the work and the result are all detached from one other. But I promised a better way, and I think it’s time we talk about that now.
Many developers are aware of Task-based programming, but few truly understand how it works under the covers. Task-based programming unifies the concepts we discussed above and greatly reduces the chances for errors in our multithreaded code. Let’s see how Task-based programming simplifies things like threads, callbacks and cross-thread scheduling.
Auto threading
In C#, whenever a method is decorated with the async keyword what we’re telling the compiler is “some code in this method can run on another thread.”
Let’s take a look at some pseudo code for saving data to a file:
public async Task SaveDataAsync()
{
	// Open the file
	...

	// Write the bytes
	...

	// Close the file
	...
}
In this example, opening the file, writing the bytes and closing the file might execute on a worker thread.
When does this magical worker thread get scheduled? It’s scheduled the moment the await operator is used.
If the SaveDataAsync method had the following line of code:
// Write the bytes
await WriteBytesAsync(...);
It would be equivalent to writing:
ThreadPool.RunAsync(()=>
{
	// Write the bytes
	WriteBytes(...);
});
The code following await really can run on a new thread, but your app doesn’t need to know that detail or pay much attention to it.
Better yet, as Stephen Toub likes to say: “One of the beautiful things about await is that it brings you back to where you were”. Let’s see what Stephen means with another code example:
private async void SaveButton_Click()
{
	// Show the "Saving" indicator
	SavingGameObject.SetActive(true);

	// Save data to disk (in another thread)
	await SaveDataAsync();

	// Show the "Saved" indicator
	SavingGameObject.SetActive(false);
	SavedGameObject.SetActive(true);
}
We know this code starts on the Render Thread since it’s responding to a Button click. So interacting with a GameObject on Line 4 makes sense. But we also know that the await keyword on Line 7 starts a new thread internally, so how would it be possible to interact with GameObjects on Lines 10 and 11?
The answer is something called a SynchronizationContext and Stephen writes about it here. In short, whenever you use await the compiler remembers which thread was running before the worker thread started. The compiler also handles returning to the starting thread as soon as the worker thread completes. That’s right, await takes care of cross-thread scheduling automatically.
Tracking the work
As I mentioned in the Thread.Start section above: A Thread represents an object that is capable of doing work rather than a request for work to be done. This is another area where Task-based programming shines. Any Task instance actually represents a request for work to be done. This is why the Task class has properties like IsCompleted and IsFaulted.
Data and exceptions
I mentioned above that callbacks and events can return data when a worker thread completes. I also mentioned that exceptions on worker threads usually mean the callback doesn’t run or the event doesn’t fire. Task-based programming solves this problem by making data part of the request itself.
Let’s see the same LoadData method from above, but we’ll implement it as a Task rather than a callback:
public async Task<ModelData> LoadDataAsync(string fileName)
{
	// Open file
	...

	// Load the data
	ModelData data = ...;

	// Return the loaded data
	return data;
}
Let’s imagine that Line 7 does some data deserialization. Most of the time this works just fine, but once in a while our app opens a corrupted file and Line 7 throws an exception. Remember, this exception is thrown on a worker thread. So how can the starting thread handle this exception? Easier than you might expect:
public async Task LoadAndRenderAsync()
{
	try
	{
		// Load the data
		ModelData data = await LoadDataAsync(...);

		// Display the data
		GameObject dataVis = ...
	}
	catch (Exception)
	{
		Log.Debug("Could not load data.")
	}
}
Again we see that compiler tricks save the day.
When we await a Task and that Task is successful, any data from that Task is returned to the starting thread. But if we await a Task and an exception happens inside the Task, that exception propagates back to the starting thread as though it happened inline! In other words, handling exceptions in Tasks is the same as handling exceptions in any normal method!
Hopefully it’s starting to become clear why Task-based programming makes multi-threading easier. Task-based programming offers a single unified model where the request, the work and the result are truly all connected to each other.
When cancellation matters
There are scenarios where a Task might run for a very long time. For example when downloading a large file on a slow network. In these scenarios it’s often helpful to make the Task cancellable. This can be accomplished by passing a CancellationToken into the async method. Then, after doing a bit of work, the method can check to see if the token has been cancelled before doing any more.
Here’s what a cancellable method might look like:
public async Task<ModelData> DownloadDataAsync(string url, CancellationToken ct)
{
	// Open the connection
	...

	// Download in a loop till done
	while (bytesDownloaded < bytesTotal)
	{
		// Download more bytes
		data.Append(...)

		// Check to see if canceled
		ct.ThrowIfCancellationRequested();
	}

	// Close the connection
	...

	// Return the data
	return data;
}
It’s important to check the CancellationToken as often as possible so the Task can be canceled quickly. When ThrowIfCancellationRequested is called, if the token has been cancelled the whole Task ends in an OperationCanceledException.
Now that we’ve seen Tasks can be canceled, let’s imagine what Azure Spatial Anchors might look like using Tasks:
// Loctes an anchor then displays it as a GameObject
public async Task ShowAnchorAsync(string id, CancellationToken ct)
{
	// Look for the anchor until found or canceled
	CloudSpatialAnchor anchor = await CloudSession.LocateAsync(id, ct);

	// Create a GameObject to represent the Anchor
	GameObject anchorObject = ...
}
I’m not suggesting that ASA should stop using events and start using Tasks. ASA can search for multiple anchors at the same time and ASA never knows when (or even if) an anchor will be located. Events work well in this situation as long as you know which events fire when. But adding support for Tasks in addition to events could help simplify a number of common scenarios.
Coroutines still have a place
Now that we’ve seen how great Tasks are, one might question why we’d write code any other way. But remember that Tasks run on worker threads and GameObjects only exist on the Render Thread. This is where coroutines shine.
Coroutines run on the Render Thread but can yield time back to the renderer. The trick is figuring out juuuust the right amount of work to do before yielding. Doing too little makes things take forever. Doing too much causes the application to become unresponsive.
Let’s imagine a coroutine that takes in data and visualizes it with GameObjects:
private IEnumerator VisualizeRoutine(ModelData data)
{
	// Loop through all entities that represent something visual
	foreach (Visual viz in data.Visuals)
    {
		// Create a GameObject to represent the entity
        GameObject go = ...

		// Update the GameObject to look like the entity
		...

		// Give time back to the renderer
        yield return new WaitForEndOfFrame();
    }
}
To maintain 60 FPS, an app needs to render each frame in about 16 milliseconds. Let’s imagine that our app takes 4 ms to render. That leaves another 12 ms available for creating GameObjects.
If Line 10 only takes 2 ms, we’re leaving 6 ms capacity on the table. Not only that, but our app can only create one GameObject per frame!
In this example, a better implementation might look something like:
private IEnumerator VisualizeRoutine(ModelData data)
{
	// How many have been created?
	int count=0;

	// Loop through all entities that represent something visual
	foreach (Visual viz in data.Visuals)
    {
		// Create a GameObject to represent the entity
        GameObject go = ...

		// Update the GameObject to look like the entity
		...

		// Update the counter
		count++;

		// Give time back to the renderer?
		if (count % 6 == 0)
		{
			yield return new WaitForEndOfFrame();
		}
    }
}
In C# the % operator calculates a remainder. So here we’re saying “after every 6th object, give time back to the renderer.” 6 objects x 2 milliseconds each = 12 ms (exactly our budget).
Obviously these numbers are unique to each app and will change over time. The app might become more visually complex, requiring longer to render. Or each individual GameObject might become more complex, taking longer to create. There is no magic number. You’ll simply need to spend time performance profiling to strike the right balance.
Coroutines as Tasks
So coroutines have their place, but now we have two different approaches for long-running code. Not only that, but the application won’t know when VisualizeRoutine completes unless we implement some sort of callback (and we already know about the hidden evil in callbacks). Wouldn’t it be great if we could treat coroutines like Tasks?
It turns out there’s a class called TaskCompletionSource which allows any long-running process to be represented as a Task. It works like this:
- At the start of a long-running process, create a TaskCompletionSource.
- Use TaskCompletionSource.Task to represent the long-running process.
- When the process completes, use TaskCompletionSource.SetResult to return the data.
- If the process encounters an error, use TaskCompletionSource.SetException to propagate the exception.
We can easily modify VisualizeRoutine to take in a TaskCompletionSource and return some data when it’s done:
private IEnumerator VisualizeRoutine(ModelData data, TaskCompletionSource<int> tcs)
{
	// How many have been created?
	int count=0;

	// Loop through all entities that represent something visual
	foreach (Visual viz in data.Visuals)
    {
		// Create a GameObject to represent the entity
        GameObject go = ...

		// Update the GameObject to look like the entity
		...

		// Update the counter
		count++;

		// Give time back to the renderer?
		if (count % 6 == 0)
		{
			yield return new WaitForEndOfFrame();
		}
    }

	// Success! Return total created objects.
	tcs.SetResult(count);
}
The only thing left is a helper method to start the coroutine and return a Task:
public Task<int> VisualizeAsync(ModelData data)
{
	// Create a TaskCompletionSource to represent the coroutine
	TaskCompletionSource<int> tcs = new TaskCompletionSource<int>();

	// Start the coroutine
	StartCoroutine(VisualizeRoutine(data, tcs));

	// Return the Task that represents the coroutine
	return tcs.Task;
}
Exception Handling in Coroutines
If you’re following closely you may have noticed one very important omission from the coroutine above. What happens if an exception is thrown before Line 26?
Unfortunately, coroutines can’t offer the same compiler tricks that async can. There’s no automatic exception propagation in coroutines, which means if we don’t handle the exception we’ll end up with an orphaned Task. Any code awaiting the Task will never resume. If you’re thinking this sounds a lot like an orphaned callback, you’re absolutely right!
“No problem.” you say, “I’ll just wrap everything in a try/catch block.”
Which might look something like this:
private IEnumerator VisualizeRoutine(ModelData data, TaskCompletionSource<int> tcs)
{
	// The following may fail
	try
	{
		// How many have been created?
		int count=0;

		// Loop through all entities that represent something visual
		foreach (Visual viz in data.Visuals)
		{
			// Create a GameObject to represent the entity
			GameObject go = ...

			// Update the GameObject to look like the entity
			...

			// Update the counter
			count++;

			// Give time back to the renderer?
			if (count % 6 == 0)
			{
				yield return new WaitForEndOfFrame();
			}
		}

		// Success! Return total created objects.
		tcs.SetResult(count);
	}
	catch (Exception ex)
	{
		// Propagate the exception
		tcs.SetException(ex);
	}
}
And that’s exactly what you would do except now Line 24 generates a CS1626 compiler error.
Error CS1626 Cannot yield a value in the body of a try block with a catch clause
Why CS1626 exists is a long story, but just know that you can’t put try/catch around any lines that use yield. This leaves us with two possible options:
- Put multiple try/catch blocks around any non-yield lines
- Put try/catch around the IEnumerator itself
Option 1 is the easiest but it doesn’t work in all cases. For example, you couldn’t put try/catch around the foreach statement because the foreach statement encompasses a yield.
But how could we implement Option 2? Usually the IEnumerator is passed directly into StartCoroutine.
Unfortunately, this is where things get a little ugly. The IEnumerator interface has one property and two methods. We have to make absolutely sure that if any part IEnumerator throws an exception we end the Task.
To help with this I created ExceptionSafeRoutine. You can find it in AsyncUtils.cs on GitHub. ExceptionSafeRoutine takes an IEnumerator and a TaskCompletionSource. If any exception is thrown in IEnumerator, that exception is set on the TaskCompletionSource. There’s also an extension method that turns any IEnumerator into an ExceptionSafeRoutine.
Finally, here’s how we update VisualizeAsync to make sure the Task always completes:
public Task<int> VisualizeAsync(ModelData data)
{
	// Create a TaskCompletionSource to represent the coroutine
	TaskCompletionSource<int> tcs = new TaskCompletionSource<int>();

	// Start the coroutine
	StartCoroutine(VisualizeRoutine(data, tcs).WithExceptionHandling(tcs));

	// Return the Task that represents the coroutine
	return tcs.Task;
}
What’s cool about this approach is any exceptions get propagated – even if the coroutine has zero try/catch blocks! This makes coroutines work just like async. The only thing we have to remember is to add .WithExceptionHandling when starting a coroutine.
Wrapping up
Whew! My 8 year brain dump is finally complete. 😁
If you made it to the end, I’d really love to hear your thoughts. Did you learn anything new? Do you have any tips that I missed or should add to this handbook? If so, please leave a message in the comments below or reach out to me in e-mail, on Linked-In or on Twitter.

Thanks for the thorough post, Jared. I found it helped me understand multithreading in general much better as well. I’ve been looking at ways to do multithreading for my Unity game and I think this approach is going to help.
Awesome! Thank you so much Cassius, and best of luck on your game!
Very nice summary, thanks! Cooperation of coroutines with async/awaits seems to be very ineresting topic.
I hope you know “When does this magical worker thread get created? It’s created the moment the await operator is used.” is pretty oversimplified 🙂 An example of the same topic from my blog: https://tooslowexception.com/net-asyncawait-in-a-single-picture/
Hey Konrad. You’re absolutely right that I oversimplified that a bit. 😊 Since my goal was to illustrate how tasked-based programming helps alleviate developers from having to work hard to get threading right, I didn’t want to dive too deeply into how those mechanisms function. Your article seems complimentary to the topic, and if folks would like to dig deeper I also highly recommend Stephen Toub’s many other great articles on async.
P.S. I also updated the wording to say “scheduled” rather than “created”, since to your point the ThredPool is actually the creator and async is just scheduling.
I’m just going to leave this here, because I’ve recently discovered it and fallen in love with it completely.
https://github.com/Cysharp/UniTask
UniTask marries the benefits of async/await (exceptions, cancellation, no callbacks etc) with Unity’s single-thread player loop. You can also use regular Tasks with it, switch to thread pool, etc..
That is an excellent find! I actually think I remember stumbling across this when it was just getting started, but it looks like it’s come a long way. I’ll definitely take a closer look, and thank you for sharing!